When you install TFS 2010, you can have the setup automatically install and configure Windows SharePoint Service 3.0 (WSS) for you. Unfortunately you can’t have it use SharePoint Foundation 2010 instead so you are faced with manually installing this if you wish to use it. This blog post walks you through installing SharePoint Foundation 2010 as part of a fresh TFS 2010 install.
NOTE: The focus of this blog post is about how you can choose to install SharePoint Foundation 2010 instead of Windows SharePoint Services 3.0 for use with TFS 2010. It is not a post about best practises for installing or configuring TFS 2010.
Step 1: Install Operating System and SQL Server
- Install and configure server with your Operating System (Eg. Windows Server 2008 R2) and SQL Server (Eg. SQL Server 2008 R2). Make sure you follow the detailed instructions in the Team Foundation Installation Guide for Visual Studio 2010
Step 2: Download SharePoint Foundation 2010
- You can download SharePoint Foundation 2010 from the Microsoft Download site at http://www.microsoft.com/downloads/en/details.aspx?FamilyID=49c79a8a-4612-4e7d-a0b4-3bb429b46595&displaylang=en
Step 3: Install SharePoint Foundation 2010
- Start the SharePoint Foundation installation by double-clicking the SharePointFoundation.exe file
- On the SharePoint Foundation 2010 splash screen, click the “Install software prerequisites” link in the Install section.
- On the Welcome screen, click Next
- Accept the licensing agreement and click Next
- Once the prerequisites have been installed, click Finish.
- On the SharePoint Foundation 2010 splash screen, click the “Install SharePoint Foundation” link in the Install section.
- Accept the terms of the agreement and click Continue
- When prompted to “Choose the installation you want”, make sure you click the “Server Farm” button.
- Select Complete for the Server Type and click Install Now.
- On the Run Configuration Wizard page, leave the checkbox checked and click Close.</ol> Step 4: Configure SharePoint Foundation 2010
- On the Welcome page of the SharePoint Products Configuration Wizard, click Next
-
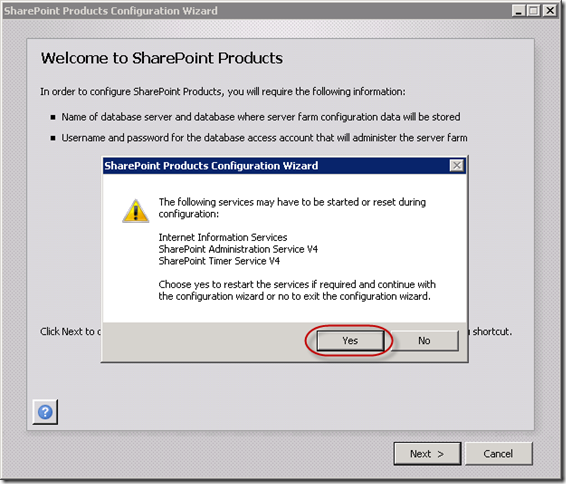
You will see the following dialog letting you know some of the services may be started or reset during the configuration. Click Yes.

- Click “Create a new server farm” and click Next
- Provide a Passphrase and click Next
- Specify 17012 as the SharePoint Central Administration website port and click Next
- Click Next on the “Completing the SharePoint Products Configuration Wizard” page.
- Once the configuration is complete you should click “Finish” on the Configuration Successful screen.
- You should now see the SharePoint Central Administration site appear in a browser on your server. Click Cancel, you do NOT want to run the Server Farm Configuration wizard.
- Close your browser.</ol> Step 5: Create a Web Application
Now that you have installed SharePoint Foundation 2010 and completed the initial configuration, you must create a Web Application.
-
Open the SharePoint Central Administration site. (Start Menu All Programs Microsoft SharePoint 2010 Products SharePoint 2010 Central Administration) -
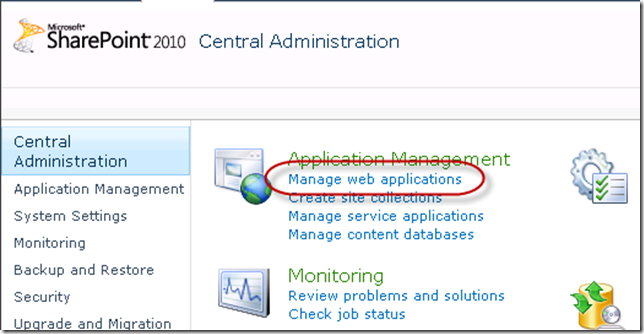
Under the Application Management heading, click Manage web applications.

- In the toolbar, click the New button
-
In the “Create New Web Application” dialog, enter the following settings:
Authentication Classic Mode Authentication IIS Web Site use Existing IIS web site (Default Web Site) Port 80 Host header {Blank} Path C:inetpubwwwroot Security Configuration Authentication Provider: NTLM
Allow Anonymous: No
Use Secure Socket Layer (SSL): NoPublic URL http://your-server-name:80/ Application pool Create new application Pool
Application Pool name: SharePoint –80
Security Account:domainwss_service accountDatabase name Server name: Your DB servername
Database Name: WSS_Content
Database Authentication: Windows AuthenticationFailover Server {Blank} Search Server {Blank} Service Application Connections Accept {Default} Customer Experience Improvement Program No (up to you) Click on OK
- If you are prompted to change the site from Kerberos to NTLM, click OK
- Once the site has been created, click OK</ol> Step 6: Configure security
-
Open the SharePoint Central Administration site. (Start Menu All Programs Microsoft SharePoint 2010 Products SharePoint 2010 Central Administration) - Under the Security heading, click Manage the farm administrators group.
- Click Add Users from the New drop down menu
- Enter the TFS Service account (eg domaintfs_service) into the dialog and click OK </ol>
Once you have completed these steps you can run the TFS 2010 setup.exe program and as part of the configuration phase, your SharePoint configuration will be verified.
Enjoy using SharePoint Foundation 2010 with your shiny new TFS 2010 server.
- Click Add Users from the New drop down menu
- Under the Security heading, click Manage the farm administrators group.
- If you are prompted to change the site from Kerberos to NTLM, click OK
-
- In the toolbar, click the New button
-
- You should now see the SharePoint Central Administration site appear in a browser on your server. Click Cancel, you do NOT want to run the Server Farm Configuration wizard.
- Once the configuration is complete you should click “Finish” on the Configuration Successful screen.
- Click Next on the “Completing the SharePoint Products Configuration Wizard” page.
- Specify 17012 as the SharePoint Central Administration website port and click Next
- Provide a Passphrase and click Next
- Click “Create a new server farm” and click Next
-
- Select Complete for the Server Type and click Install Now.
- When prompted to “Choose the installation you want”, make sure you click the “Server Farm” button.
- Accept the terms of the agreement and click Continue
- On the SharePoint Foundation 2010 splash screen, click the “Install SharePoint Foundation” link in the Install section.
- Once the prerequisites have been installed, click Finish.
- Accept the licensing agreement and click Next
- On the Welcome screen, click Next
- On the SharePoint Foundation 2010 splash screen, click the “Install software prerequisites” link in the Install section.